
Changing the Printer
During the PCA start up, it reads an XML file called PrinterConfiguration.xml to get the printer name it should use during the printing process. The procedure below outlines the steps to update the PrinterConfiguration.xml to specify the printer.
In the example below, the HDP5000e printer will be specified. The same procured can be used for the HDP6600 printer.
-
Open the Windows Printers & Scanners panel. Next, locate the printer to be used obtain the full name of the printer.
-
Go to PCA folder, locate the PrinterConfigation.xml file and back this file up to a separate folder. Next, edit the PrinterConfigation.xml file. In the printerName tag, enter the full name of the printer from step 1. An example of the completed tag will look like: <printerName>HDP5000e Card Printer</printerName>.
-
Save the PrinterConfiguration.xml. If PCA is opened, closed and reopen PCA.
Changing the Printer Card Reader
The printer card reader is the reader that is embedded in the printer. This reader will read the smart card serial number of the inserted card and perform validation on the card to ensure it is approved for printing. The instructions below show how change the default setting to a custom reader.
-
Open ActivClient. In the reader list, determine the reader that is installed in the printer. Typically this is the OMNIKEY CardMan 5x25.
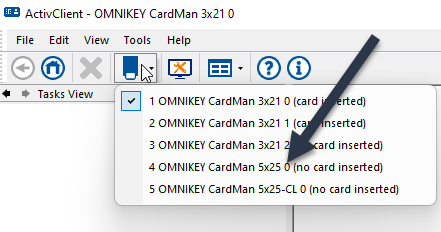
-
Go to PCA folder, locate the PrinterConfigation.xml file and back this file up to a separate folder. Next, edit the PrinterConfigation.xml file. In the printerReaderName tag, enter the full name of the card reader from step 1. An example of the completed tag will look like: <printerReaderName>OMNIKEY CardMan 5x21 0</printerReaderName>
-
Save the PrinterConfiguration.xml. If PCA is opened, closed and reopen PCA.