
This process uses uses the command line to issue the certificate request to the CA.
Overview
-
Create the Request via IIS Manager. Save as sslCert2.txt
-
Submit using the command: certreq -attrib "CertificateTemplate:webserver" –submit sslCert2.txt
CA Preparation
For the Web Server certificate, the SAN must also be configured.
certutil -setreg policy\EditFlags +EDITF_ATTRIBUTESUBJECTALTNAME2
Create the request via the command line
-
Open the Certificate MMC, Local Computer
-
Right click on Personal, Select All Tasks, Advanced Operations, Create Custom Request
-
When the certificate enrollment wizard opens, Click Next
-
Highlight, “Configured by you” Custom Request, Proceed without enrollment policy. Press Next
-
For template, select Legacy Key, Request Format, PKCS# 10
-
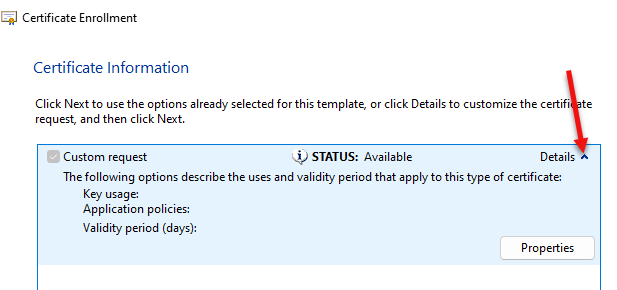
In custom request, press the down arrow on Details and Press Properties
-
In the general tab, enter the friendly name
-
In the subject tab, select common name, and enter the dns name. In the alternative name, select DNS, and enter the dns name.
-
In the Extensions tab, click key usage. Add digital signature, Key encipherment and non repudiation
-
Next, click the Extended Key Usage, Add Server Authentication and Client Authentication
-
Select the Private Key Tab, Key Options, Select 2048, Check Make private key exportable
-
Press Apply, Press OK
-
In the Certificate Enrollment Wizard, Press Next
-
Save the file using Base 64 to c:\temp sslCert.req
-
Go to the command prompt and run: certreq -attrib "CertificateTemplate:webserver" –submit sslCert.req
-
When the Certificate Authority List pops up, select the CA and press OK
-
Save the certificate to c:\temp
-
Go back to the certificate snap in, Local Computer, Personal. Import the certificate that was just created
-
Export the certificate
-
Use IIS manager to import the certificate