
IDMS System Upgrade Procedure
Purpose
This procedure upgrades the Identity Management System (IDMS) to the latest version. The upgrade updates the application files, database schema, and web interface while preserving existing configuration and data.
Estimated Time: 15-20 minutes
System Downtime: 10-20 minutes (during steps 2-9)
Permissions Required: Local Administrator. The IDMS database service account must have temporary "Add Table" permission.
Before Getting Started
Prerequisites Checklist
Ensure the following items are in place before beginning the upgrade:
-
[ ] IDMS is operational: Log into the IDMS portal using your system administrator credentials and verify you can access the main dashboard. If login fails, resolve connectivity issues before proceeding.
-
[ ] Database permissions verified: The IDMS service account must have ADD TABLE and ALTER TABLE permissions on the IDMS database.
-
[ ] Local administrator rights: You must have local administrator privileges on the IDMS application server (the server where IDMS is installed, typically the web server hosting the application).
-
To verify: Right-click Command Prompt and confirm you see "Run as administrator" option
-
-
[ ] Installation package available: The IDMS upgrade package has been downloaded and extracted to a known location on the IDMS server
-
[ ] Chrome or Edge browser available: You have access to Google Chrome or Microsoft Edge browser for post-upgrade verification
-
[ ] Backup storage identified: You have identified a secure location with at least 500 MB free space for the IDMS backup
What You'll Need
-
IDMS system administrator credentials
-
Access to the IDMS application server
-
IDMS upgrade installation package (typically named HIDPIVIDMS_X.X.X.zip or IdExchange_X.X.X.zip)
-
Approximately 45-60 minutes of uninterrupted time
Step 1: Document Current System Version
Before making any changes, record the current IDMS version for verification purposes.
-
Open your web browser and navigate to the IDMS portal (example: https://idms.yourcompany.com:444/idms)
-
Log in using your IDMS system administrator credentials
-
Click System in the top navigation menu
-
Click Connections in the submenu
-
Locate the System Version Number field and write down the complete version number (example: 1.10.17.0)
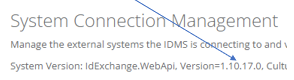
Expected Result: You have documented the current version number and confirmed IDMS is accessible.
Step 2: Stop the IIS Web Server
Stop the web server to prevent users from accessing IDMS during the upgrade.
-
Press the Windows key on your keyboard
-
Type
cmd -
Right-click Command Prompt in the search results
-
Click Run as administrator
-
If prompted by User Account Control, click Yes
-
In the command prompt window, type the following command and press Enter:
iisreset /stop -
Wait for the message "Internet services successfully stopped"
Expected Result: The command prompt displays "Internet services successfully stopped" and IDMS is no longer accessible through the web browser.
Important: Keep this command prompt window open for later use.
Step 3: Locate the IDMS Installation Directory
Find the IDMS application folder that needs to be backed up.
-
In File Explorer, navigate to one of the following locations:
-
C:\Program Files (x86)\CyberArmed\ -
C:\Program Files (x86)\HID Global\
-
-
Open the folder that exists on your server (only one of these will be present, depending on your IDMS installation type)
-
Verify you can see the IDMS folder inside
-
Make note of the complete path for the next step
Expected Result: You have located the IDMS installation folder and confirmed its location.
Note: If neither folder exists, contact IDMS support before proceeding as this indicates a non-standard installation.
Step 4: Backup the Current IDMS Installation
Create a backup of the existing IDMS installation to enable rollback if needed.
-
In File Explorer, navigate to the IDMS installation directory identified in Step 3
-
Right-click the IDMS folder
-
Click Copy
-
Navigate to your designated backup location (example:
C:\Backups\IDMS\) -
Right-click in the empty space and click Paste
-
Right-click the copied IDMS folder
-
Click Rename
-
Rename the folder to include the current date and version number:
-
Format:
IDMS_Backup_YYYYMMDD_v[version] -
Example:
IDMS_Backup_20241216_v1.10.17.0
-
-
Press Enter to save the new name
-
Open the backup folder and verify it contains subfolders and files
Expected Result: You have created a complete backup of the IDMS folder with the date and version in the folder name, and verified it contains the application files.
⚠️ CRITICAL: Do not proceed until you have verified the backup is complete and accessible. This backup is required for rollback if the upgrade fails.
Step 5: Run the IDMS Installer
Execute the IDMS upgrade installation package.
-
In File Explorer, navigate to the location where you extracted the IDMS upgrade package
-
Open the IDMS Upgrade folder
-
Open the Installer folder
-
Locate the file named IdmsIis.msi
-
Make note of the complete path to this file (example:
C:\Temp\HIDPIVIDMS_x.x.x.x\IDMS Upgrade\Installer\IdmsIis.msi OR C:\TEMP\IdExchange_x.x.x.x\IDMS Upgrade\Installer\IdmsIis.msi) -
Return to the administrative command prompt window from Step 2
-
Type
cdfollowed by the path to the Installer folder (example:cd C:\Temp\IDMS_Upgrade_v6.0\IDMS Upgrade\Installer\) -
Press Enter
-
Type the following command and press Enter:
IdmsIis.msi -
The IDMS installation wizard will open
-
Follow the on-screen prompts and click Next through the installation wizard
Expected Result: The installation wizard completes successfully and displays "Installation Complete" with no error messages.
Step 6: Update IDMS Configuration
Run the configuration assistant to update the IDMS settings and database schema.
-
Press the Windows key on your keyboard
-
Type
IDMS Configuration Assistant -
In the search results, locate IDMS Configuration Assistant
-
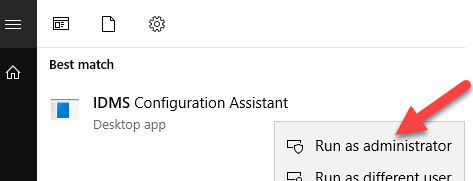
Right-click IDMS Configuration Assistant
-
Click Run as administrator
-
If prompted by User Account Control, click Yes
-
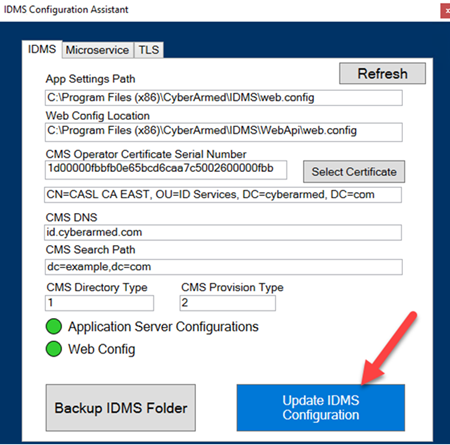
Wait for the IDMS Configuration Assistant window to open (5-10 seconds)
-
In the Configuration Assistant window, click the Update IDMS Configuration button
-
Wait while the configuration updates (typically 2-5 minutes)
-
You will see a progress indicator
-
Do not close the window during this process
-
-
When the update completes, you will see a message "Configuration update completed successfully"
-
Click OK to acknowledge the message
-
Click the X button in the top-right corner to close the IDMS Configuration Assistant
Expected Result: The Configuration Assistant displays "Configuration update completed successfully" and closes without errors.
Step 7: Restart the IIS Web Server
Restart the web server to make IDMS available with the upgraded version.
-
Return to the administrative command prompt window
-
Type the following command and press Enter:
iisreset /restart -
Wait for the message "Internet services successfully restarted"
Expected Result: The command prompt displays "Internet services successfully restarted" with no error messages.
Step 8: Verify the Upgrade
Confirm the IDMS upgrade was successful by checking the system version.
-
Open a new Incognito window in Google Chrome (press Ctrl+Shift+N) or a new InPrivate window in Microsoft Edge (press Ctrl+Shift+P)
-
Navigate to the IDMS portal (example: https://idms.yourcompany.com:444/IDMS)
-
Log in using your IDMS system administrator credentials
-
Click System in the top navigation menu
-
Click Connections in the submenu
-
Locate the System Version Number field
-
Compare this version number to the version you documented in Step 1
-
Verify the version number has changed to the new version (the version number should be higher than the previous version)
-
Navigate to 2-3 different pages in IDMS to confirm the interface loads correctly
-
Log out of IDMS
Expected Result: The System Version Number displays the new version number (higher than the version recorded in Step 1), and the IDMS interface loads without errors.
Why use Incognito/InPrivate mode? Private browsing mode forces the browser to download fresh copies of all web files, ensuring you see the upgraded interface rather than cached files from the previous version.
Validation Checklist
After completing all steps, verify the following:
-
[ ] The System Version Number in IDMS matches the expected upgrade version
-
[ ] You can successfully log into IDMS
-
[ ] The IDMS main dashboard loads without errors
-
[ ] You can navigate to multiple sections of IDMS (System, Connections, Users, etc.)
-
[ ] No error messages appear in the browser
-
[ ] The administrative command prompt showed no error messages during IIS restart
-
[ ] You have retained the backup folder from Step 4
If any items are not checked: Proceed to the Rollback Procedure section immediately.
Rollback Procedure
Use this procedure if the upgrade fails or IDMS does not function correctly after the upgrade.
When to Perform a Rollback
Perform a rollback if:
-
The System Version Number did not update
-
You cannot log into IDMS
-
IDMS displays error messages after the upgrade
-
Critical IDMS functions are not working
Rollback Steps
-
Return to the administrative command prompt and stop IIS:
iisreset /stop -
Navigate to the IDMS installation directory (from Step 3):
-
C:\Program Files (x86)\CyberArmed\or -
C:\Program Files (x86)\HID Global\
-
-
Rename the current IDMS folder to IDMS.Failed.Upgrade:
-
Navigate to your backup location (from Step 4)
-
Copy the backup IDMS folder you created (example:
IDMS_Backup_20241216_v5.2.1.3450) -
Navigate back to the installation directory
-
Paste the backup folder
-
Rename the backup folder to IDMS (remove the date and version suffix)
-
Restart IIS:
iisreset /restart -
Open a browser and verify you can access IDMS with the previous version number
-
Contact IDMS support to report the failed upgrade and request assistance
Troubleshooting
Issue: "Internet services successfully stopped" message does not appear
Cause: IIS may already be stopped or the command was mistyped
Resolution:
-
Verify you typed
iisreset /stopexactly (note the space after iisreset) -
Check if IIS is already stopped by typing
iisreset /status -
If IIS is already stopped, proceed to the next step
Issue: Cannot find the IDMS folder in Step 3
Cause: Non-standard installation location or incorrect folder path
Resolution:
-
Search for "IDMS" in File Explorer
-
Look for a folder containing "web.config" and application files
-
If you cannot locate the folder, contact IDMS support before proceeding
Issue: IDMS loads but displays the old version number
Cause: Browser is loading cached files
Resolution:
-
Close all browser windows
-
Open a new Incognito/InPrivate window
-
Clear your browser cache (Ctrl+Shift+Delete, select "Cached images and files")
-
Navigate to IDMS again
-
If the version still shows the old number, proceed to the Rollback Procedure
Issue: "Configuration update completed successfully" does not appear
Cause: Configuration update process timed out or encountered an error
Resolution:
-
Wait an additional 5 minutes (some updates take longer on large databases)
-
If still no message, close the Configuration Assistant
-
Check the Windows Event Viewer for IDMS-related errors (Application logs)
-
Perform a rollback following the Rollback Procedure section
-
Contact IDMS support with Event Viewer error details