
How to Set the Job Schedule For Health Checks
This procedure guides you through accessing the job scheduling interface and modifying the configuration for an for the external system health checks.
Prerequisites:
-
You must have successfully logged into the IDMS application.
-
You must possess the necessary permissions (e.g., SystemManager role) to access and modify job schedules.
Step-by-Step Procedure:
-
Acknowledge System Warning:
-
Upon initial access, a "Warning" dialog box may appear, providing important system usage information.
-
Click the "I Understand, Continue" button to proceed to the main dashboard.
-
-
Navigate to Scheduling:
-
From the main dashboard, locate the left navigation pane.
-
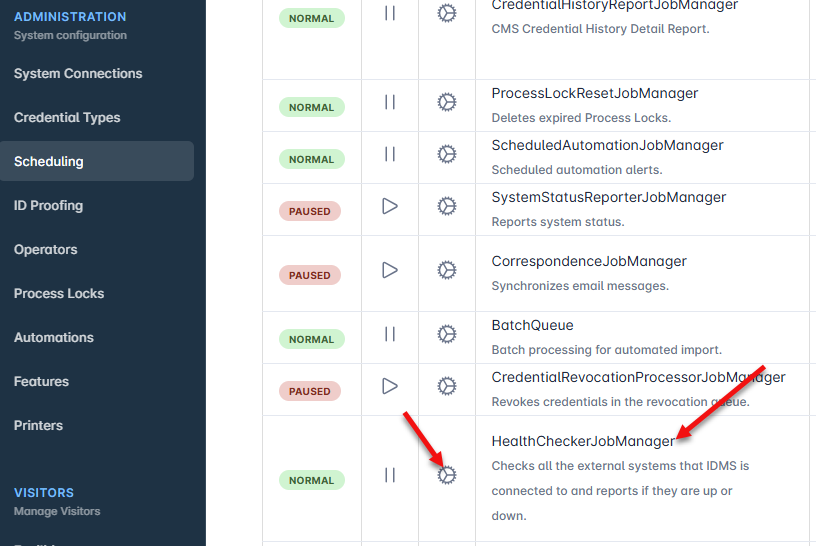
Under the ADMINISTRATION section (System configuration), click on "Scheduling".
-
Result: The "Job Information" screen will load, displaying a table of all configured job schedules.
-
-
Locate and Select Job to Update:
-
On the "Job Information" screen, review the list of scheduled jobs. You may need to scroll down to find the desired job.
-
Locate the specific job you wish to modify (e.g., "HEALTHCHECKJOBMANAGER").
-
Click the "Update" icon (a circular arrow icon typically located at the end of the job's row) corresponding to that job.
-
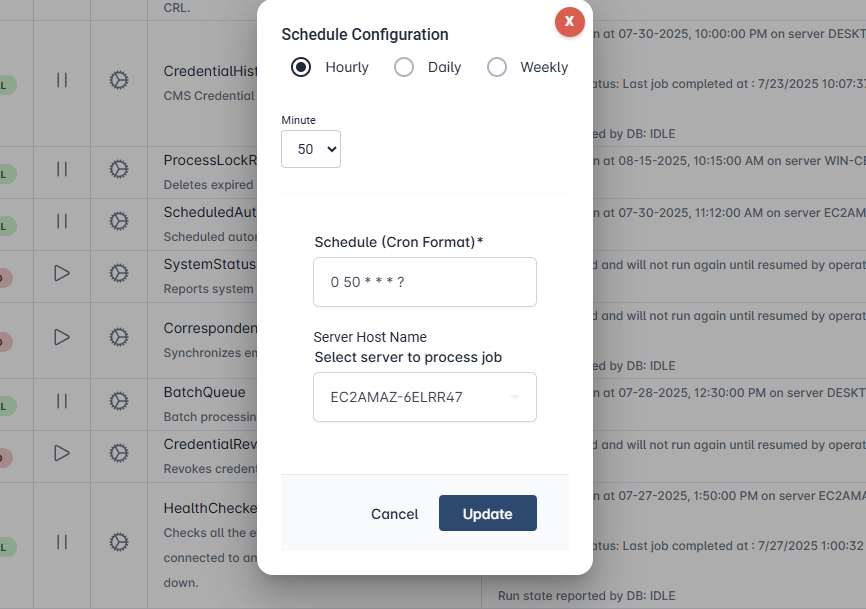
Result: The "Refresh Schedule Configuration" dialog box will appear, displaying the current settings for the selected job.
-
-
Adjust Schedule Configuration:
-
Within the "Refresh Schedule Configuration" dialog box, modify the desired scheduling parameters:
-
Minute: Click the dropdown menu next to "Minute" to select a new minute for the job execution (e.g., "50").
-
Select server to process job: Click the dropdown menu next to "Select server to process job" to choose a different server for the job to run on (e.g., "WIN-WSNTOP-VFM").
-
-
Review any other settings as needed (e.g., Hourly, Daily, Weekly, Monthly options).
-
-
Apply Changes:
-
Once you have made all necessary adjustments to the schedule configuration, click the "Update" button at the bottom of the "Refresh Schedule Configuration" dialog box.
-
Result: The dialog box will close, and the updated job schedule will be reflected in the "Job Information" table.
-