Relying Party: Active Directory
Prerequisite:
SystemManager account permission
An active directory account that can access Active Directory and has update permission to the altSecurityIdentities attribute.
To create the Relying Party Active Directory Connection
Authenticate to IDMS → Administration, → System Connections
Click, + System Connection, Select Relying Party

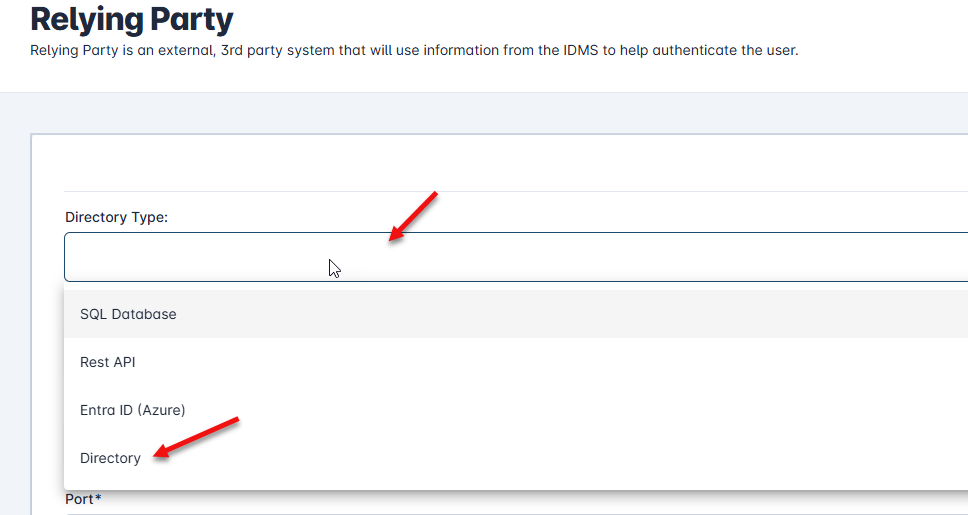
In the Relying Party Configuration screen, Click the Directory Type drop down and select Directory.
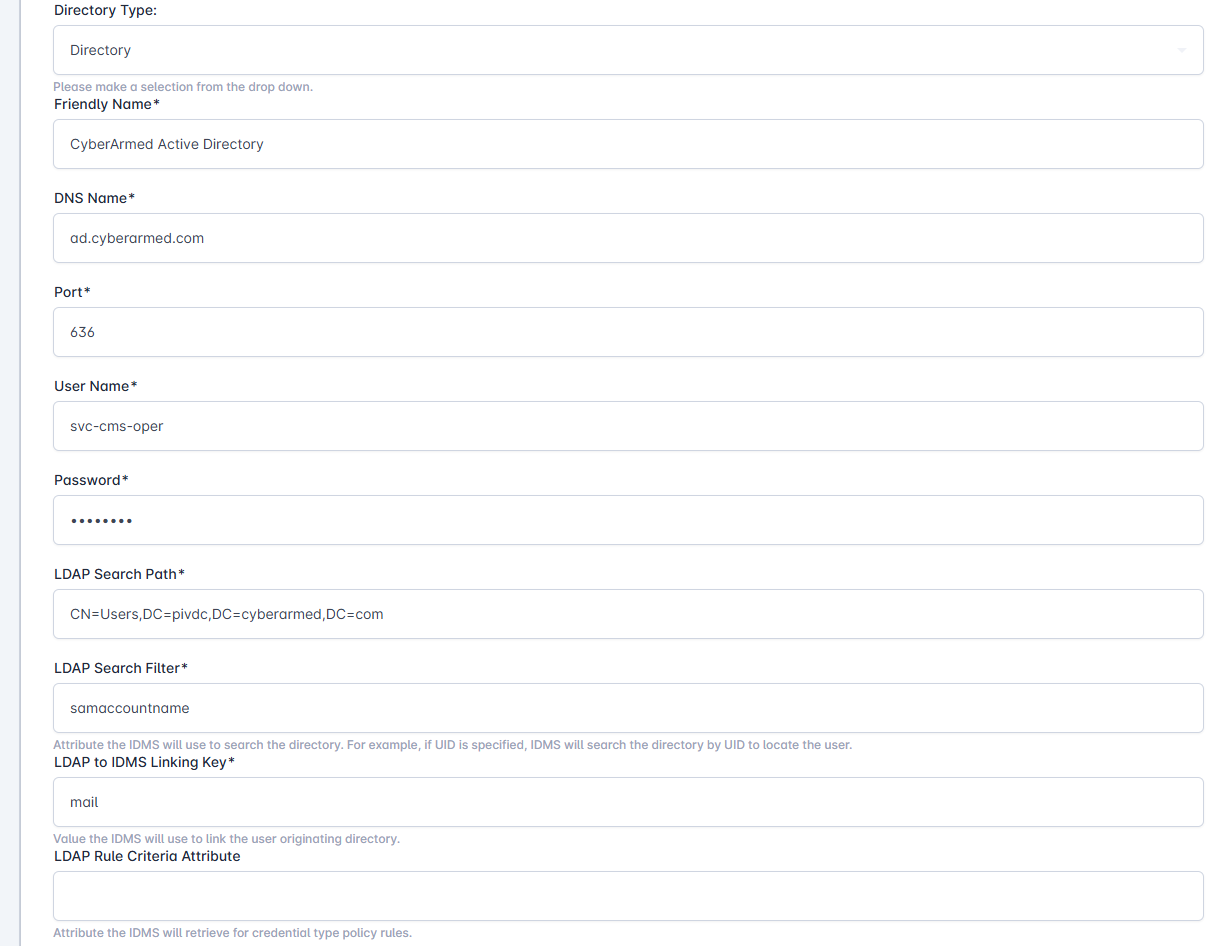
Enter the Friendly Name, DNS Name, Port, User name (this is the account that has access to Active Directory), Password to the account), LDAP Search Path, LDAP Search Filter and LDAP to IDMS Linking Key. Scroll down and press Add.
Confirm the system addition.
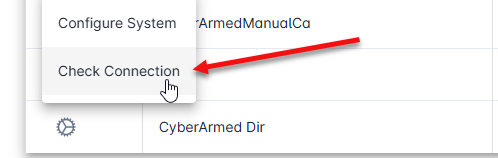
After the system is created, locate the system and press check connection to verify the system is connected and operational.
Advanced configurations for enrolling 3rd party devices.
The Advanced UPN Sync Settings panel lets an operator configure how the system handles a user's User Principal Name (UPN) when integrating with an LDAP-based Relying Party. It is only available on the Edit Directory screen when the directory Type is Relying Party (RLPT) and the System Type is LDAP; in every other case the button is hidden. The panel exposes two independently-controlled features: (1) Mail fallback on missing UPN, which tells the system to use the user's mail attribute when their userPrincipalName is missing, and (2) Sync UPN to AD attribute, which writes the user's UPN into a chosen Active Directory attribute (such as proxyAddresses) according to formatting rules the operator chooses — target attribute, value format (prefixed or plain), optional prefix string (e.g. smtp), lowercase normalization, duplicate-detection behavior, and how to react to write failures. When the operator clicks Save, the panel serializes all selected options into a JSON document and stores it in the directory record's ConfigureTwo field, where the backend reads it at runtime. Re-opening the panel for an already-configured directory reads the existing JSON back and pre-populates the form, so operators always see the current configuration.
Steps to configure
Open the panel. Navigate to System Administration → Edit Directory for the relying party you want to configure. Once the page loads, locate the LDAP Rule Criteria Attribute field and click the Advanced settings button beside it.

Enable the features you want. Use the top toggle to turn on Mail fallback on missing UPN if you want the system to fall back to the mail attribute when a UPN is missing. Use the second toggle to turn on Sync UPN to AD attribute if you want to write the UPN into an Active Directory attribute. Both toggles are off by default; the fields below the second toggle stay disabled until you turn it on.
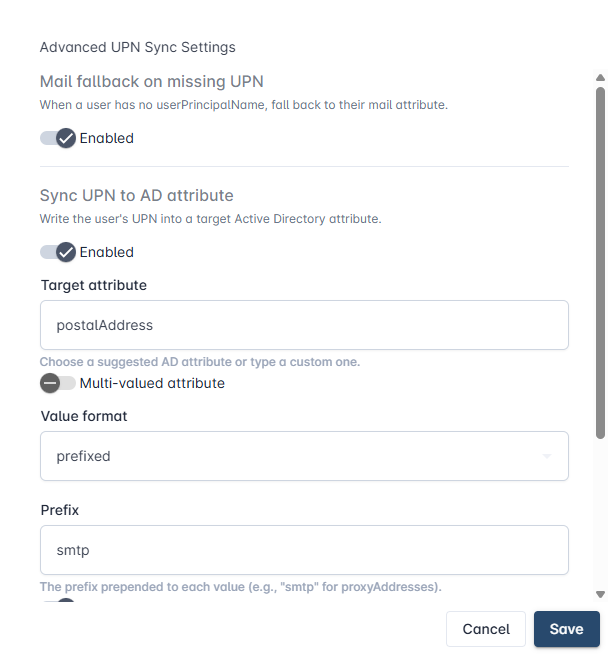
Set the sync details. With Sync UPN to AD attribute enabled, choose a Target attribute (pick a suggestion such as proxyAddresses, mail, userPrincipalName, or otherMailbox, or type a custom AD attribute name), pick a Value format (prefixed adds a string like smtp: in front of the value; plain writes the value as-is), enter a Prefix if you chose prefixed, and adjust the remaining toggles (Multi-valued, Lowercase value, Skip if already present, Treat prefix variants as duplicates) and the On write failure behavior (warn, error, or ignore) to match your operational policy.
Save and persist. Click Save in the dialog — the panel writes the resulting JSON into the ConfigureTwo field on the form. Then click Update at the bottom of the Edit Directory page to persist the change to the backend. To discard your changes instead, click Cancel in the dialog.
Example 1 — Feature disabled (both toggles off)
Scenario: You want the directory connection saved, but you don't want any UPN fallback or attribute sync behavior.
Panel settings:
Mail fallback on missing UPN → off
Sync UPN to AD attribute → off
Resulting JSON:
{"schemaVersion":1,"mailFallbackOnMissingUpn":{"enabled":false},"syncUpnToAdAttribute":{"enabled":false,"targetAttribu
te":"proxyAddresses","multiValued":true,"valueFormat":"prefixed","prefix":"smtp","lowercase":true,"skipIfAlreadyPresen
t":true,"treatPrefixVariantsAsDuplicates":true,"onWriteFailure":"warn"}}
Example 2 — Mail fallback only
Scenario: Some user accounts in this directory don't have a userPrincipalName populated. You want the system to fall
back to their mail attribute, but you don't want to write anything back to AD.
Panel settings:
Mail fallback on missing UPN → on
Sync UPN to AD attribute → off
Resulting JSON:
{"schemaVersion":1,"mailFallbackOnMissingUpn":{"enabled":true},"syncUpnToAdAttribute":{"enabled":false,"targetAttribut
e":"proxyAddresses","multiValued":true,"valueFormat":"prefixed","prefix":"smtp","lowercase":true,"skipIfAlreadyPresent
":true,"treatPrefixVariantsAsDuplicates":true,"onWriteFailure":"warn"}}
Example 3 — Standard Exchange proxyAddresses sync (most common)
Scenario: You want each user's UPN written into their proxyAddresses AD attribute prefixed with smtp: (the standard
Exchange convention), normalized to lowercase, and skipped if an equivalent value already exists. Warn on failure
rather than blocking.
Panel settings:
Mail fallback on missing UPN → on
Sync UPN to AD attribute → on
Target attribute → proxyAddresses
Multi-valued attribute → on
Value format → prefixed
Prefix → smtp
Lowercase value → on
Skip if already present → on
Treat prefix variants as duplicates → on
On write failure → warn
Resulting JSON:
{"schemaVersion":1,"mailFallbackOnMissingUpn":{"enabled":true},"syncUpnToAdAttribute":{"enabled":true,"targetAttribute
":"proxyAddresses","multiValued":true,"valueFormat":"prefixed","prefix":"smtp","lowercase":true,"skipIfAlreadyPresent"
:true,"treatPrefixVariantsAsDuplicates":true,"onWriteFailure":"warn"}}
Example 4 — Plain write to a custom extension attribute, strict failure handling
Scenario: You want each user's UPN written as-is (no prefix) into a custom AD attribute (extensionAttribute5). The
attribute is single-valued. Failures should halt the operation rather than warn.
Panel settings:
Mail fallback on missing UPN → off
Sync UPN to AD attribute → on
Target attribute → extensionAttribute5 (type it in — not in the suggestion list)
Multi-valued attribute → off
Value format → plain
(Prefix field hidden because format is plain)
Lowercase value → off
Skip if already present → on
Treat prefix variants as duplicates → off
On write failure → error
Resulting JSON:
{"schemaVersion":1,"mailFallbackOnMissingUpn":{"enabled":false},"syncUpnToAdAttribute":{"enabled":true,"targetAttribut
e":"extensionAttribute5","multiValued":false,"valueFormat":"plain","prefix":"smtp","lowercase":false,"skipIfAlreadyPre
sent":true,"treatPrefixVariantsAsDuplicates":false,"onWriteFailure":"error"}}
Example 5 — Write to mail, ignore failures silently
Scenario: You're populating the mail attribute from the UPN for accounts that don't have one set, and you want
failures (e.g., insufficient permissions on individual objects) to be ignored so the overall sync isn't interrupted.
Panel settings:
Mail fallback on missing UPN → off
Sync UPN to AD attribute → on
Target attribute → mail
Multi-valued attribute → off
Value format → plain
Lowercase value → on
Skip if already present → on
Treat prefix variants as duplicates → off
On write failure → ignore
Resulting JSON:
{"schemaVersion":1,"mailFallbackOnMissingUpn":{"enabled":false},"syncUpnToAdAttribute":{"enabled":true,"targetAttribut
e":"mail","multiValued":false,"valueFormat":"plain","prefix":"smtp","lowercase":true,"skipIfAlreadyPresent":true,"trea
tPrefixVariantsAsDuplicates":false,"onWriteFailure":"ignore"}}